You’ve reached one of the late stages of the game, where upgrading the Space Elevator can now only unlock Tier 9. In this phase you’ll handle propulsion and must deliver four additional parts you obtained across Tiers 7 and 8. It’s a major undertaking, requiring lots of resources and long production chains before you can craft and ship these four end products. With patience and a solid infrastructure, though, it’s absolutely manageable!
Preparing for Satisfactory Space Elevator Phase 4: Nuclear power, energy, and scaling production
The further you progress in Satisfactory, the more complex and larger your factories become. That’s especially true in Phase 4 of the Space Elevator, where many of your earlier achievements come together. The four parts demand a lot of work, but once your setup is in place, nothing stands in your way.
For Space Elevator Phase 4 in Satisfactory you’ll need:
- 500x Assembly Director System
- 500x Magnetic Field Generator
- 250x Thermal Propulsion Rocket
- 100x Nuclear Pasta
We recommend tackling each part separately and step by step. Look at which components they’re composed of and how you can streamline the sequence. Sometimes you can overlap steps and produce one subcomponent that feeds multiple parts. It’s crucial to expand your power grid for this. Nuclear power unlocked in Tier 8 can help, otherwise Rocket Fuel or Turbofuel are solid options.
Many of these parts also build on earlier phases, such as producing Versatile Framework, Modular Engines, and Adaptive Control Units. Extending and repurposing those lines should be straightforward.
There are no alternate recipes for any of the four final parts, but you can still leverage alternates upstream. They can simplify sections of your production and save resources overall. We already have a guide to the best alternate recipes if you want to learn more (Satisfactory: The 10 Best Alternate Recipes for Efficient Factories) .
Crafting the Assembly Director System: Supercomputers and Adaptive Control Unit
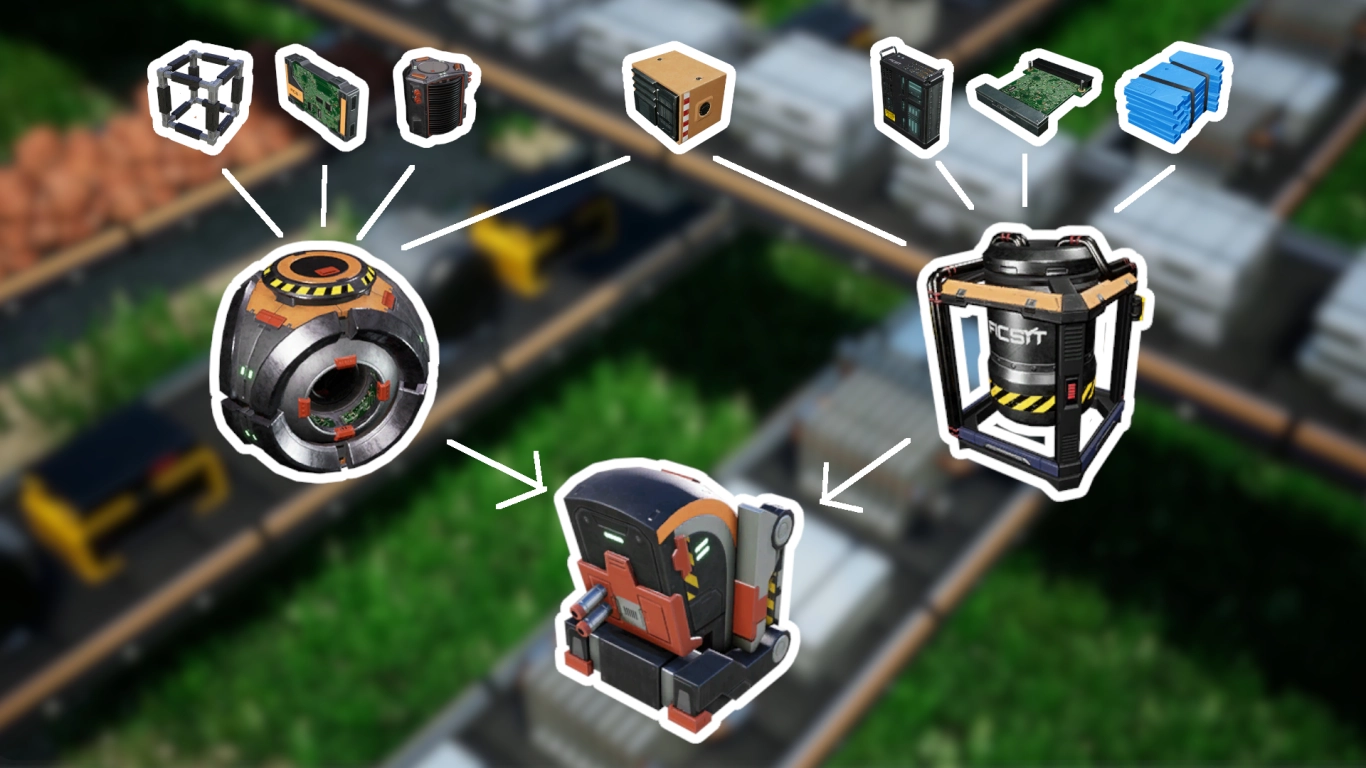
The Assembly Director System is actually one of the simpler Phase 4 parts and breaks down cleanly. There are several overlaps in production here, which makes things easier. It’s made from two items:
Supercomputer: Use standard Computers, AI Limiters, High-Speed Connectors, and Plastic to craft Supercomputers. The recipe is simpler than it looks, because many subparts like Cable, Stators, and Circuit Boards should already be familiar and in production.
Adaptive Control Unit: This consists of four parts: Automated Wiring, Circuit Board, Heavy Modular Frame, and Computer. You’ll already notice overlaps with the Supercomputer chain.
Building the Magnetic Field Generator: Versatile Framework and Electromagnetic Control Rod
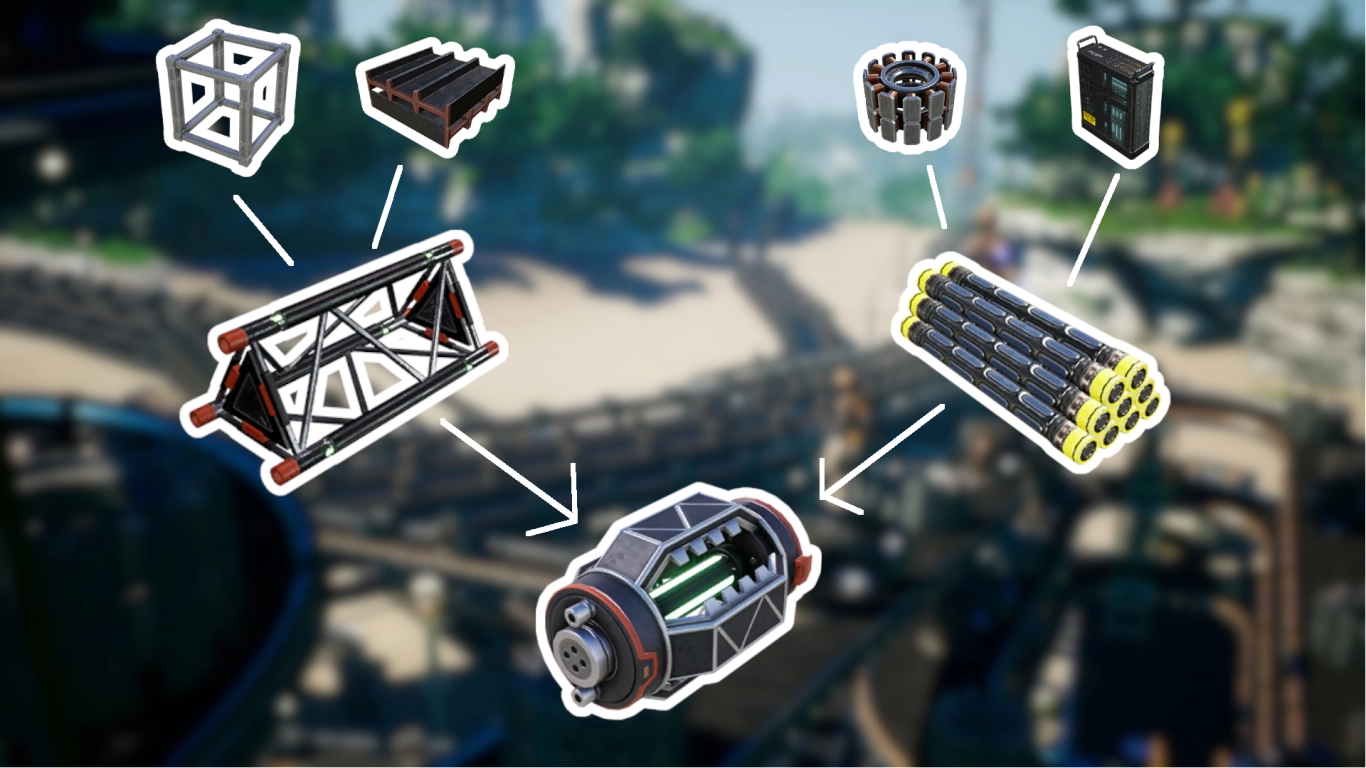
The Magnetic Field Generator is a surprisingly straightforward branch of Space Elevator Phase 4. You’ll recognize Versatile Framework from earlier phases, since it was needed in Phases 2 and 3. Control Rods are also relatively light to produce. Aside from making Stators from Steel Pipes and Wire, there are no real overlaps between the two sides here.
Versatile Framework: You should have Modular Frames and Steel Beams running smoothly by now.
Electromagnetic Control Rod: You’ll need Stators and, once again, AI Limiters, which you can likely carry over from the previous step.
Producing the Thermal Propulsion Rocket: Modular Engine, Turbo Motor, Cooling System, and Fused Modular Frame
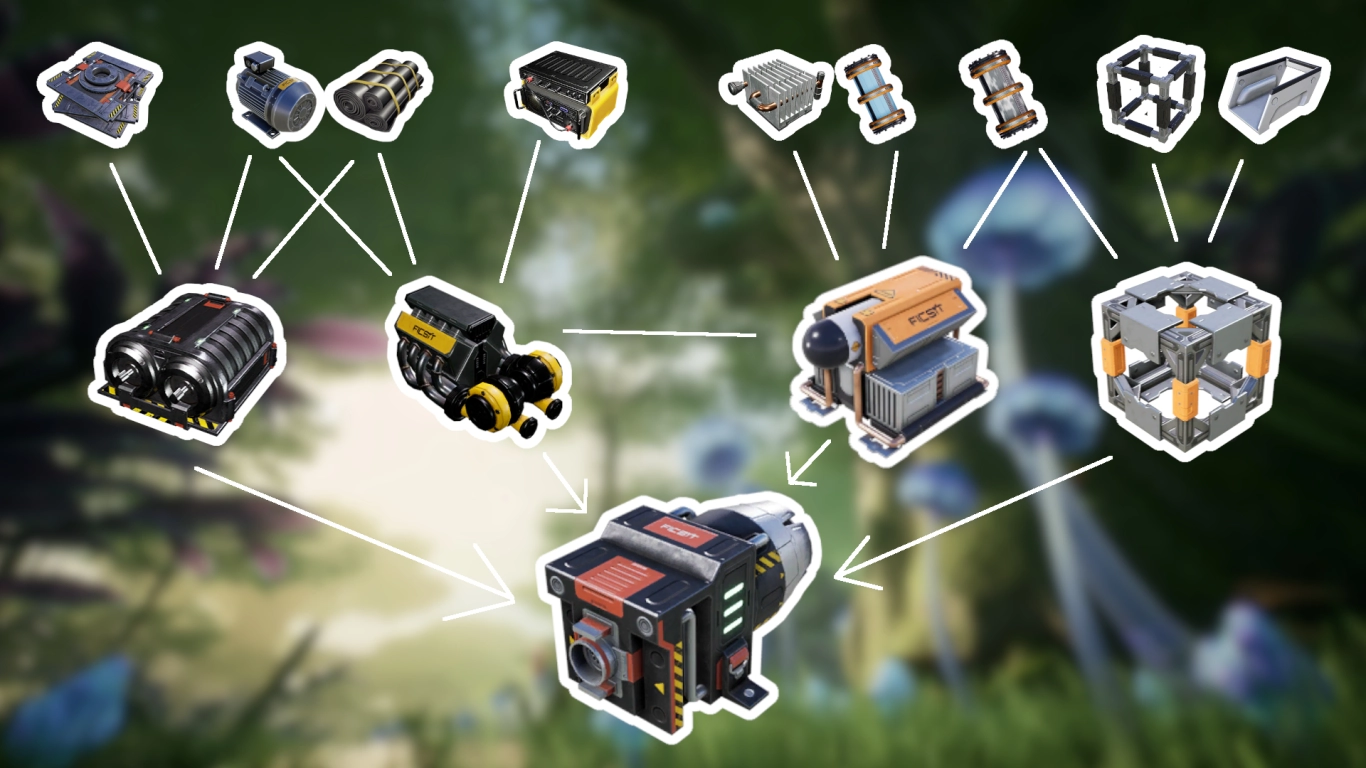
The last two parts are notably tougher, starting with the Thermal Propulsion Rocket. Here you’ll combine four components, each of which also requires substantial work. Break this into multiple steps to keep your overview. There are many overlaps here, so a large mega-factory shines.
Modular Engine: Requires Motors, Rubber, and Smart Plating—three items you should be able to produce without trouble.
Turbo Motor: These need similar items, which helps. Combine Rubber, Motors, Cooling Systems, and Radio Control Units. You can tie the Motor and Rubber lines together to feed both Modular and Turbo Motors.
Cooling System: Since you need Cooling Systems for Turbo Motors anyway, this is essentially already included. You’ll need Heat Sinks, Water, Nitrogen Gas, and again Rubber.
Fused Modular Frame: Finally, you’ll craft another tier of modular frames, with overlaps as well. They use Nitrogen Gas, Heavy Modular Frames, and Alclad Aluminum Sheet. Nitrogen Gas, therefore, serves both the Cooling Systems and these frames.
The Thermal Propulsion Rocket clearly benefits from a consolidated factory. Many parts interlock, easing your workload. For example, Rubber, Motors, and Nitrogen Gas can feed multiple chains. Cooling Systems are already part of another subassembly, simplifying things further.
Making Nuclear Pasta: Copper Powder and Pressure Conversion Cube with the Particle Accelerator

Lastly, you’ll produce Nuclear Pasta, one of the most advanced items in the game. At first glance, the recipe is simple since you only combine two components. However, you’ll first need a Particle Accelerator, which ties into nuclear power. The building itself is the main challenge; the items are comparatively simple.
Copper Powder: The easiest recipe in Phase 4—just process Copper Ingots.
Pressure Conversion Cube: Also not hard to produce, since you’re already making everything for the Thermal Propulsion Rocket. The Cube is made from Fused Modular Frames and Radio Control Units.
As you can see, there are shortcuts here because you’ve already produced many parts for the Rocket and can simply expand and reuse those lines.
Conclusion and tips: Unlock the final milestone, Tier 9, in Satisfactory
With Space Elevator Phase 4 in Satisfactory, you’re steadily approaching the end of the story. You’ll bring all your resources together one more time to unlock the final milestone, Tier 9. The good news is that many steps overlap, and you can carry over several parts from Phase 3. In the end, it’s less complicated than it first appears.
To play this far smoothly, rent your own server for the game from us: https://www.4netplayers.com/en/gameserver-hosting/satisfactory/! Many hours of fun, puzzling, and true brain training await as you optimize your factories. The more efficient you are, the faster you’ll reach and complete Phase 4!
More interesting articles
Satisfactory Space Elevator Phase 3 Guide: Unlock Tiers 7 and 8
Satisfactory Tier 9 Guide: Converter, Conveyor Belts Mk. 6, Portals, and more
Satisfactory Space Elevator Phase 5 Guide: Recipes, Production, and Tips
Satisfactory Tier 8 Guide: Nuclear Power, Drones, and Mk.3 Miners